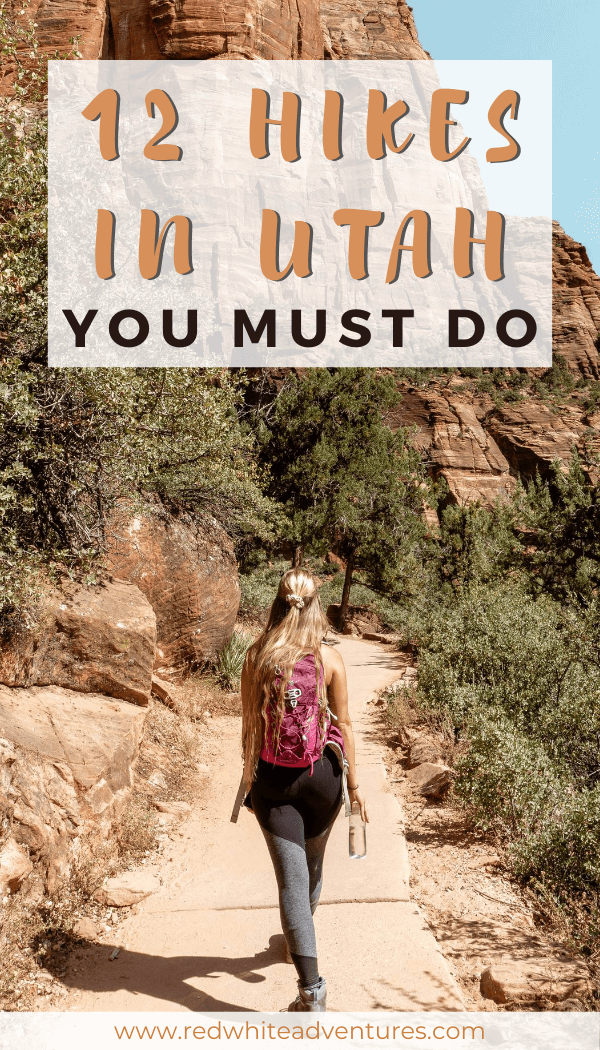
12 of the Best Hikes to Do in Utah
Are you looking to explore some of the best hikes in Utah? Everyone’s dreamed of hiking in Utah and visiting the Big 5.
It may be because of the old Western movies you watched as a kid. Or all the “Gram” photos that fill your feed but there’s something about Utah’s unique landscape that attracts millions and millions every year.

The hiking in Utah is amazing. Every hike you go on will feel different and unique. You’ll witness crazy arches, amphitheaters, hoodoos, and lots of other land formations in Utah.
So prepare yourself for an epic list of some of the best hikes in the state of Utah.
It doesn’t matter if you’re looking for some hikes near Utah or you’re hiking down in Southern Utah, here is a list of the best hikes across the whole state. We’re sure you will surely find something that works for you.
So let’s get straight to it. We have 12 hikes in Utah written by some awesome adventurers who are passionate about the outdoors and want to share their favorite hikes in Utah with the world.
Disclaimer: This post contains affiliate links which means if you decide to use the links and make a valid purchase, we will receive a small commission at no additional cost to you. Thank you for your support!
12 Amazing hikes you have to do in Utah
Hiking Tip: Look up the trail on AllTrails before starting your hike 🗺️. You can find important trail information, such as recent wildlife sightings and trail closures. Check out the free version here or get a 7-day free trial of AllTrails+ here.
Easy hikes
- Queen’s Garden/Navajo Loop in Bryce Canyon National Park
- Mesa Arch Trail in Canyonlands National Park
- Corona Arch Trail near Arches National Park
Moderate hikes
- Kanarra Creek Waterfall in Zion National Park
- The Wave Trail slot canyon near Kanab
- Ramparts Trail in Cedar Breaks National Park
- Delicate Arch Trail in Arches National Park
- The Narrows in Zion National Park
- Scouts Lookout Trail in Zion National Park
Difficult hikes
- Devil’s Garden Trail in Arches National Park
- Chesler Park Loop in Canyonlands National Park
- Kings Peak Trail in Northern Utah
Remember to leave no trace
When you go hiking (and do other outdoor adventure activities), always remember to follow the 7 principles of leaving no trace.
This means:
- Plan ahead and prepare.
- Travel and camp on durable surfaces.
- Dispose of waste properly.
- Leave what you find.
- Minimize campfire impacts.
- Respect wildlife.
- Be considerate of others.
Devil’s Garden Trail in Arches National Park
By James Ian from ParksCollecting

Practical information about Devils Garden Loop Trail
Location: Arches National Park
Distance: 13.7 km return / 8.5 miles return
Elevation: 345 meters / 1132 feet elevation gain
Type: Loop (clockwise or counter depending on how you do it)
Length: 3-4.5 hours return (including breaks)
Difficulty: Hard (Because of the Utah heat)
Rating: 4.5 out of 5 stars
The Devil’s Garden Trail is my favourite hike in Arches National Park. The full hike takes you to Eight Arches.
You will also traverse along the tops of fins/ridges and down into Fin Canyon. There are options for varying levels of fitness.
The hike itself starts from the Devil’s Garden parking lot, at the end of the road that goes into the park.
The trail starts and is divided into three connected trails. The first trail to Landscape Arch, along a fairly flat paved path, is the easiest. The path starts by squeezing between tall fins before opening up.
The arches on this route, accessed by a short side trail, are Tunnel Arch, looking like a tunnel in the distance and Pine Tree Arc, named after the pine tree sitting in the middle of it.
This section of the trail ends at Landscape Arch, the fourth longest natural span in the world. The Landscape Arch trail takes about 35 minutes one way and is a very popular trail.
So if you don’t have a full day or started hiking too late into the day, then Landscape Arch is a nice and easy hike in Arches National Park.
If you’re lucky enough and started early in the morning (which you should for most hikes in Utah) then you can continue on a more challenging trail to Double O Arch.
The section of the trail is still quite popular but definitely less crowded. It starts by climbing up and over a narrow fin.
Another part of the trail involves walking along a narrow ridge with steep drops on both sides. So it is not great for those with a fear of heights but still manageable if you take your time.
The arches included on this part of the trail are Partition Arch and Navajo Arch. The trail ends after about one hour and forty minutes at the spectacular Double O Arch. The arch is a small O below and a much larger O above.
You can climb up and through the small O for a stunning view of both arches which I highly recommend for some amazing pictures.
You can also find a little side trail that goes out to Dark Angel which is a large black spire.
The final section is the primitive trail, which is the least crowded and requires a good level of fitness. It is marked with rock cairns as it dips down into Fin Canyon.
I would only recommend going to the very end if you have enough water and it’s not too late into the afternoon.
If you find that you want to make it all the way to the end of the primitive trail then make sure to bring enough water.
Also if it’s possible, try and start around 6-7am in the morning as the hike can take up to 4 hours to complete with breaks. So go early before the sun gets to you.
Kanarra Creek Waterfall in Southern Utah
By Nicole from American Obsessed

Practical information about Kanarra Creek Waterfall
Location: Zion National Park
Distance: 5.1 km return / 3.2 miles return (can go further if you want)
Elevation: 224 meters / 735 feet elevation gain
Type: In and out trail
Length: 2-5 hours return (depending how far into the canyon you want to go)
Difficulty: Easy to moderate (Because of the Utah heat)
Rating: 5 out of 5 stars (absolutely amazing hike)
One of my favorite hikes near Zion National Park is the Kanarra Creek Waterfall. This waterfall is located in a slot canyon in Utah near Kanarraville in southern Utah. It is located just outside of Zion National Park – the Kolob Canyon section.
There is a kiosk at the beginning of the trail where you will show your permit. A permit is required for this hike and costs $12 but it is so worth it. Permits are limited to 150 hikers per day.
The hike is a 3.2 miles round trip through the canyon. If you want to go further though you can but we decided to turn back at that point.
One thing you should know though is that you will be walking through water to get to the waterfall.
It takes anywhere from 2-5 hours depending how far into the canyon you go. It is rated a moderate hike and you will gain 600 feet in elevation on the hike. If you start later in the day it may be better to not go as far because of the heat.
Kanarra Falls has increased in popularity over the years due to Instagram. It is extremely popular and permits sell out days in advance. If not months in advance during the summer months.
If you are lucky enough to get a permit, I recommend going early in the day or late in the afternoon to beat the rush of people between 9am and 4pm.
There are no facilities at this location so please observe the leave no trace principle and take everything you brought back out with you again. We don’t want to ruin the beauty of Kanarra Falls for future hikers.
This is a great little hike to do especially if you are not able to do The Narrows in Zion National Park.
The best time to do this hike would be from April-October but you will also need to check the weather for rain and flash floods.
I would absolutely recommend Kanarra Falls to anyone wanting to experience hiking through some canyons in Utah. It’s one of the best hikes in Utah in my opinion and I would give it 5 stars.
Queen’s Garden/Navajo Loop in Bryce Canyon National Park
By Jess from I’m Jess Traveling

Practical information about Queens Garden/Navajo Loop
Location: Bryce Canyon National Park
Distance: 4.7 km return / 2.92 miles return (can go further if you want)
Elevation: 192 meters / 630 feet elevation gain
Type: Loop trail
Length: 1.5-2.5 hours return
Difficulty: Easy
Rating: 4 out of 5 stars
Bryce Canyon in my opinion is one of the most underrated national parks in the United States.
Although smaller in size, it not only exceeded my expectations but it contains one of my favorite hikes in Utah.
Located in Southern Utah, Bryce Canyon is known for its spire-shaped rock formations known as hoodoos. The red, white and orange colored hoodoos fill the park offering visitors spectacular views.
One of the best ways to experience these hoodoos is by hiking the Queens Garden Trail.
The Queens Garden Trail is one of the most popular hikes in Bryce Canyon. Since it’s so popular I recommend hiking at sunrise. Not only will you get epic views before you start but you’ll have the trail all to yourself.
Conveniently located, the trailhead starts at sunrise point. As you descend down to the canyon floor you start to get a sense of how large the hoodoos really are.
On the canyon floor you enter the silent city, which are rows of crimson hoodoos crowded together. Continue to follow the signs towards Navajo Loop. Connect with this trail and ascend back up the canyon.
The Queen’s Garden/Navajo Loop Trail is an easier trail and fun for the whole family. It totals 2.9 miles, has elevation gains of about 600 feet and takes 2 hours to complete. I rate this hike a 4 out of 5 due to the insane views and ease of the hike.
But one of the best parts about hiking the Queen’s Garden Trail is that you can link up with a bunch of other awesome hiking trails in Bryce Canyon, including Wall Street.
Linking Wall Street to the Queen’s Garden/ Navajo Loop is the icing on the cake of an already epic hike.
It’s an extra half mile of steep switchbacks but worth the climb as you stare at the gigantic hoodoos that surround you.
The Wave Trail slot canyon near Kanab
By Anna from My Travel Scrapbook

Practical information about The Wave Trail
Location: Kanab
Distance: 10.1km return / 6.3 miles return
Elevation: 358 meters / 1175 feet elevation gain
Type: In and out
Length: 2.5-3.5 hours return (Enjoying the views and taking pictures)
Difficulty: Moderate
Rating: 4 out of 5 stars
The Wave trail near Kanab is the perfect day hike and is one of my favourite hikes in Utah! We were looking for a cheaper Antelope canyon alternative and this came up. We did not want to join a tour and would rather hike in a slot canyon by ourselves instead so The Wave worked out perfectly.
When researching the best slot canyons in the American Southwest, The Wave just outside of Kanab which starts in Utah but goes into Arizona looked almost as pretty as Antelope Canyon and was much cheaper!
For just a 6 dollar permit (lottery system) you can hike the incredible Wave trail. So it seemed like the perfect alternative which required a little bit of luck getting the lottery but absolutely worth it.
The Wave day hike is one of the best hikes in Utah as it is cheap. Plus you can bring your pet dog and it does not require technical canyoneering gear to hike.
Getting to the trailhead of this epic Utah hike is an adventure in itself. From Kanab you turn off the Highway 89 and onto House Rock Valley road.
This is a dirt road which is doable in a sedan in dry weather but in wet weather it would be impassable.
You will eventually find the trailhead for this iconic hike. Here you can also apply for the permit but we would recommend calling in advance to try and get your permit beforehand.
You can actually access Buckskin Gorge, said to be the longest slot canyon in the world from this hike.
While most hikers need an additional permit to hike in Buckskin Gorge as they need to stay overnight, just hiking the Wave does not.
The Wave is worldly in itself and you can spend hours walking there seeing the canyons and beautiful landscapes. Then walk back or follow it all the way to the confluence with Buckskin Gorge.
It is an out and back trail. In terms of how I would rate it, I would give it a 4 out of 5 due to the road and there is one obstacle which sometimes has a ladder but sometimes does not.
The Chesler Park Loop in Canyonlands National Park
By Taylor from Travel Outlandish

Practical information about The Chester Park Loop
Location: Canyonlands National Park
Distance: 16.7 km return / 10.4 miles return
Elevation: 555 meters / 1821 feet elevation gain
Type: Loop trail
Length: 4.5-6 hours return (Depending how hot it is and how many breaks you take)
Difficulty: moderate – hard (Because of the weather, Utah gets insanely hot)
Rating: 5 out of 5 stars
The Needles in The Canyonlands National Park is named for the sandstone spires that climb up from the ground in tall clusters.
It’s a rugged district in one of Utah’s most rugged parks meaning that backpacking here is a real adventure.
The Chesler Park Loop trail is the most popular backpacking trip in The Needles. Even as the most heavily trafficked trail in the district, it has a remote feeling you won’t find in other Utah parks.
The hike is easy enough at 10.4 miles but because of high temperatures and the fact you have to porter all your water, it’s tougher than it sounds.
Even still, the trip can be extended or made more remote by adding in campsites from the other resource areas.
The trails in The Needles aren’t overly difficult physically, but the real challenge is the exposure to the elements. It’s hot at most hours of the day.
There’s limited tree cover. And fields of slick rock and narrow canyons make some stretches of the hike more challenging. I would recommend doing the trail clockwise for a better experience.
You’ll need to pack in all of your own water most of the year, and have a good grasp on the trail to ensure you don’t get lost.
But if you’re up for that? It’s some of the most beautiful desert you’ll ever have the privilege to hike through.
Since summers are scorching hot, the best time of year for backpacking and hiking in the Needles is April, May, September, and October.
Backcountry permits are required for all overnight trips as well as some day trips in Canyonlands.
If you hike the Chesler Park Loop, your backcountry campsite reservation at Chesler Park will double as your permit.
At the time of writing, permits were $30 per site with a maximum group size of 7. You’ll need a private vehicle to get to the trailhead.
Other than that as long as you bring your water and start early you will have an amazing time exploring the canyons and beautiful slots located in the park.
It’s what Utah is known for and it sure doesn’t disappoint.
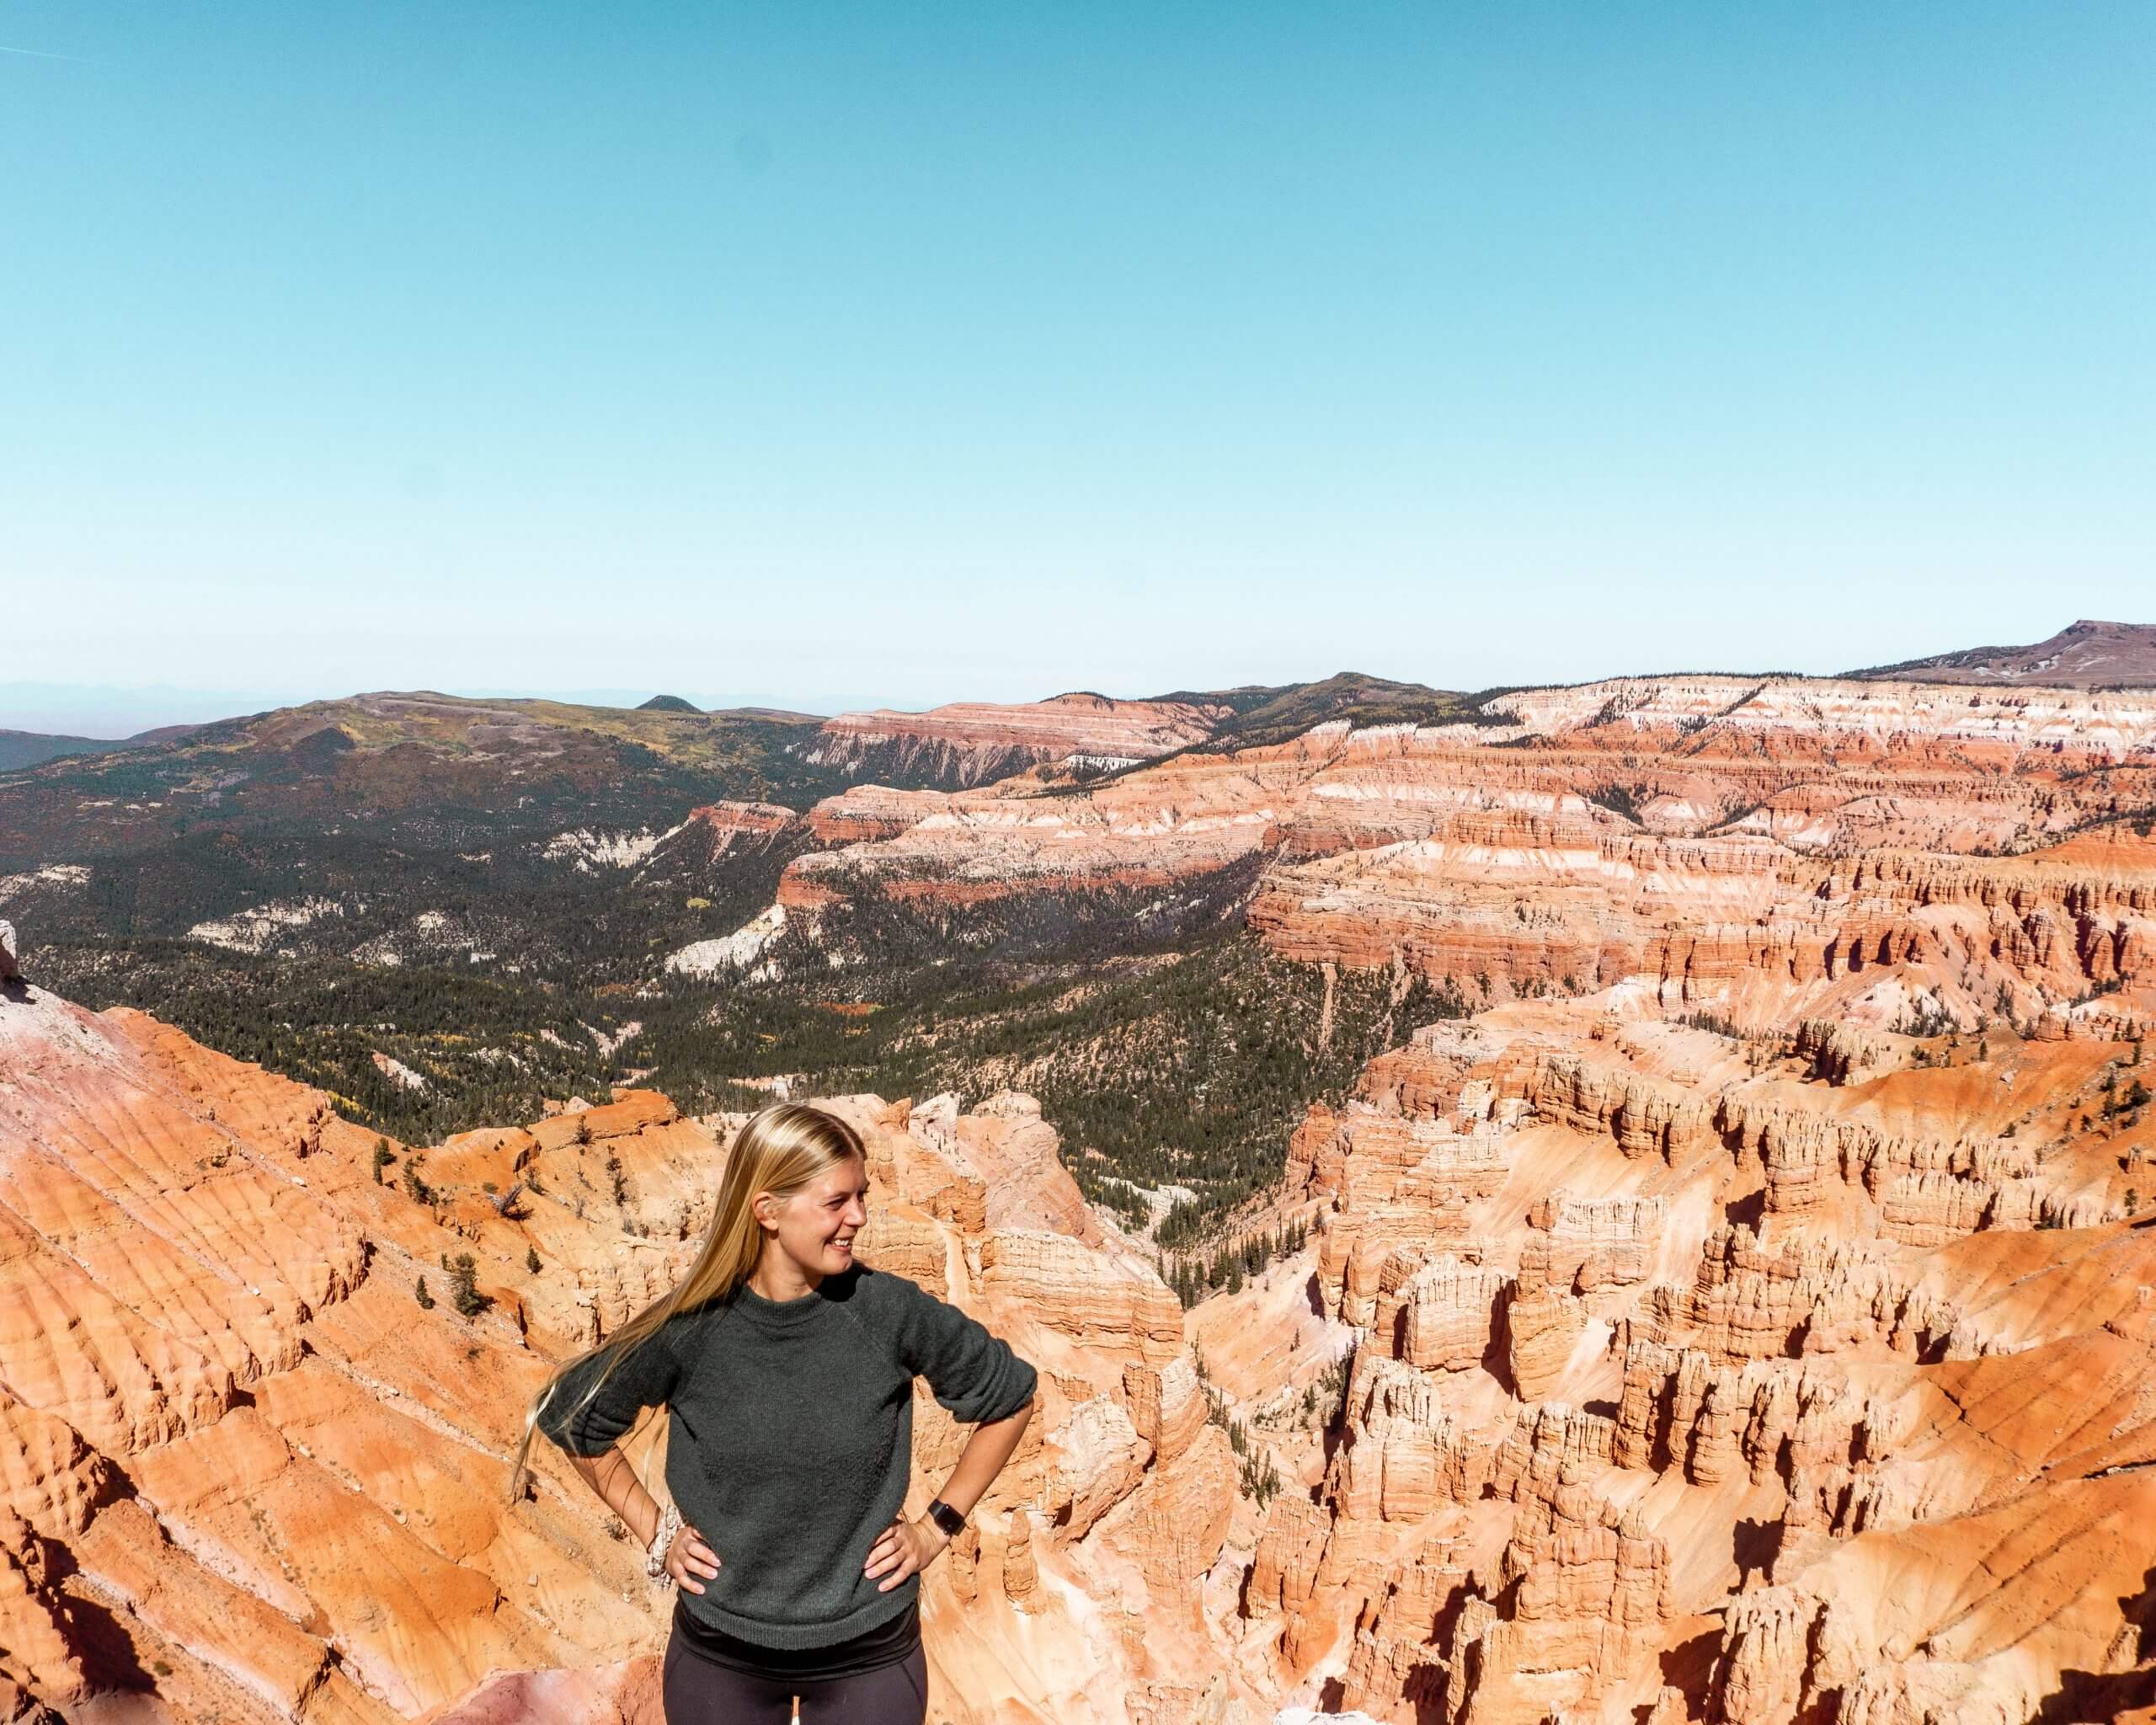
Ramparts Trail in Cedar Breaks National Park
By Jo from Red White Adventures
Practical information about The Ramparts Trail
Location: Cedar Breaks National Park
Distance: 6 km return / 3.7 miles return
Elevation: 255 m / 836 ft. elevation gain
Type: Out and back
Length: 1.5-2 hours
Difficulty: Moderate hike
Rating: 5 out of 5 stars!
This stunning day hike is one of Utah’s hidden gems. Ramparts Trail hike is located less than an hour away from Cedar City and Cedar Breaks Monument is where you will find this beautiful natural amphitheater.
We truly do consider this one of Utah’s best hikes. The feeling of walking on the rim of this enormous amphitheatre named “The Coliseum” is so surreal.
It easily feels like you’re on Mars or somewhere far far away. The rusty orange, purple, and red colors of rocks that are millions of years old truly give you a feeling of being in a different world.
The hike itself isn’t too difficult since it has minimal elevation but be prepared to get a good workout in because of the altitude you’re at.
The park is a National Park so we do recommend having that America The Beautiful Pass that gives you access to all national parks in the country.
There will be a visitor center right near the trailhead where you can leave your vehicle and start the hike from.
You’ll get a map at the visitor center as well where you can see a bunch of info on the area. From there you can follow the signs to the “Point Supreme Overlook” where you will get an idea of the hike and what to expect.
All we can say is you’re in for a treat.
Thankfully we were there in early October and the area was still open. Since it’s quite common that snow makes it inaccessible between October and May due to its high elevation and unpredictable weather this hike is usually closed by then.
So if you plan to come and explore the area do it during the summer months or early fall.
Since it’s at such a high altitude you won’t get the crazy Utah heat like you do in other parts of the state. So keep that in consideration.
We hope you enjoy this hike in southern Utah as much as we did! Ramparts trail was definitely one of our favourites because we had the majority of the hike to ourselves.
Hopefully, you get as lucky as we did and can take in these awesome views. Enjoy and stay safe out there!
Delicate Arch Trail in Arches National Park
By Kate from Our Escape Clause

Practical information about The Delicate Arch Trail
Location: Arches National Park
Distance: 5.8 km return / 3 miles return
Elevation: 146 m / 480 ft. elevation gain
Type: Out and back
Length: 2-3 hours
Difficulty: Moderate hike (but be ready for heat)
Rating: 5 out of 5 stars!
There are over 2,000 sandstone arches in Utah’s Arches National Park, but one is absolutely the most famous of them all: magnificent, 52-foot tall Delicate Arch.
Delicate Arch is a massive freestanding arch, and is so well-known it’s practically synonymous with Utah itself, even featuring on the state’s license plates!
To get the best view of Delicate Arch–or even to stand directly underneath it–you’ll want to complete the fun and exciting Delicate Arch trail.
Clocking in at 1.5 miles each way, hiking the Delicate Arch trail is a great way to spend 2-3 hours exploring Arches National Park.
However, before starting your hike, be aware that there is little-to-no shade on the trail, some portions will test those who are scared of heights, and you’ll gain a whopping 480 feet of elevation along the way–in other words, while this trail may be short, it’s not exactly a walk in the park.
It is worth it, though: the views of Delicate Arch from the end of the trail are absolutely incredible and well worth completing the hike–it’s definitely a 5/5 trail, especially given the fairly small time commitment!
Be sure to also stop along the way to check out the remains of the 19th-century Wolfe Ranch, the remarkable petroglyphs left behind by the area’s native people, and the stunning view of Delicate Arch from the Twisted Doughnut Arch–while getting to admire Delicate Arch up close is definitely the main motivation for completing the trail, it’s definitely not the only reason to visit!
For completing the Delicate Arch trail, hiking boots are preferred–you’ll want a shoe with great ankle support, closed-toed protection, and excellent grip.
You’ll also want to bring plenty of sun protection along on the trail, and of course, lots and lots of water!
Snacks aren’t a bad idea, either–in fact, the end of the Delicate Arch trail is a fantastic place to enjoy a picnic lunch in Arches National Park!
Hiking Tip: Look up the trail on AllTrails before starting your hike 🗺️. You can find important trail information, such as recent wildlife sightings and trail closures. Check out the free version here or get a 7-day free trial of AllTrails+ here.
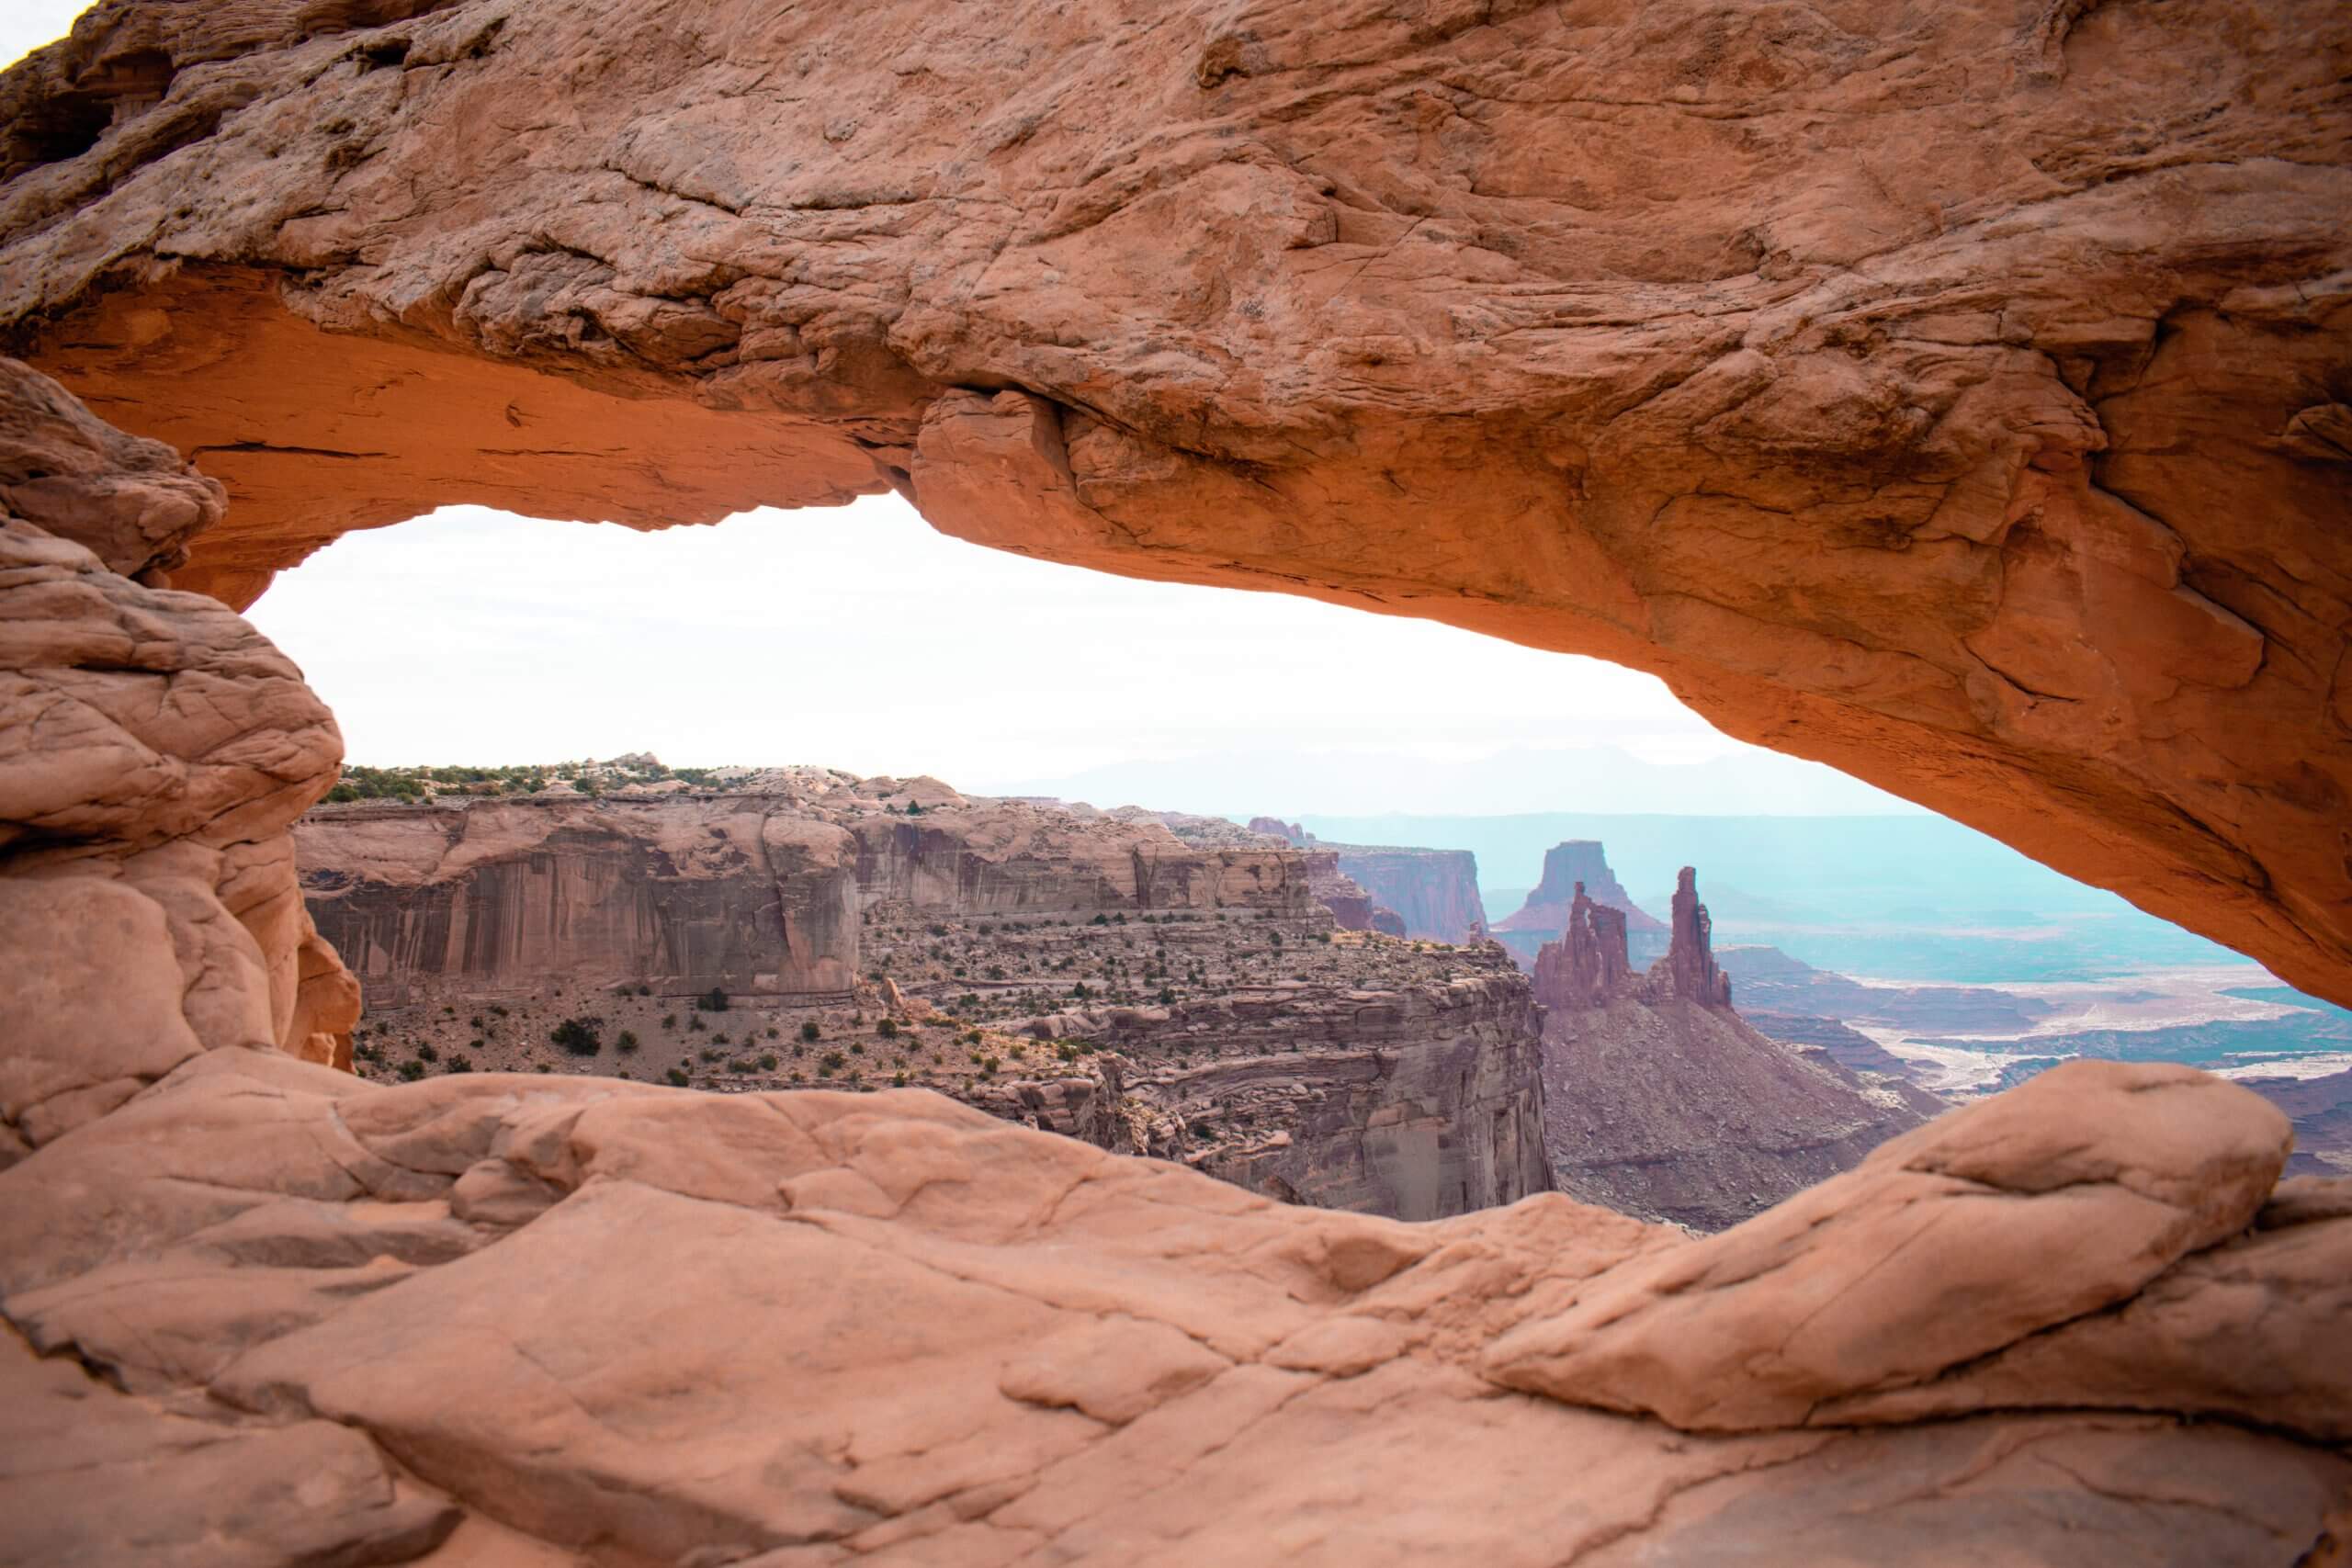
Mesa Arch Trail in Canyonlands National Park
By Katie from Katie B Travelling
Practical information about The Mesa Arch Trail
Location: Canyonlands National Park
Distance: 1.65 km return / 1.1 miles return
Elevation: 26 m / 85 ft. elevation gain
Type: Loop trail
Length: 30-60 minutes (for photos)
Difficulty: Easy (but be ready for that hot, hot weather)
Rating: 4 out of 5 stars!
Mesa Arch is a hike located in Canyonlands National Park. Known for its picturesque sunrise this is a must-do hike in Utah.
With parking off the trailhead and a short hike with a round trip distance of 1 mile, it makes it easy for all ages and abilities
While this hike can be done at any time, it is magical at sunrise. As the sun rises over Canyonlands National Park, the bottom of the Utah red rock arch will illuminate to a firing glowing orange.
Since this is a popular hike in Canyonlands National Park, especially at sunrise, be prepared to see several others and share a spot for the magical sunrise.
However, when I did this hike in July 2019, in the middle of the week, I was one of 6 people there that morning.
So if you’re doing a US road trip or don’t work during some random weekday then it may be best to do that.
That way you’ll have the view basically to yourself. Plus you’ll be able to get some amazing photos of the sunrise without any people in your shot.
Do not expect that on a weekend morning or during peak season. Do take a flashlight or headlamp if you are planning on going before sunrise as you will need to see the trail markers to know where you are going.
They are quite easy to follow but it is quite hard to see in the dark so the flashlights or headlamps help a bunch.
The view is absolutely amazing and even though it’s a very short hike it’s absolutely worth doing to see the Mesa Arch.
There are tons of arches around Utah but this one was one of my favourites. So go early to avoid the heat and crowds of people and you will truly enjoy this arch.
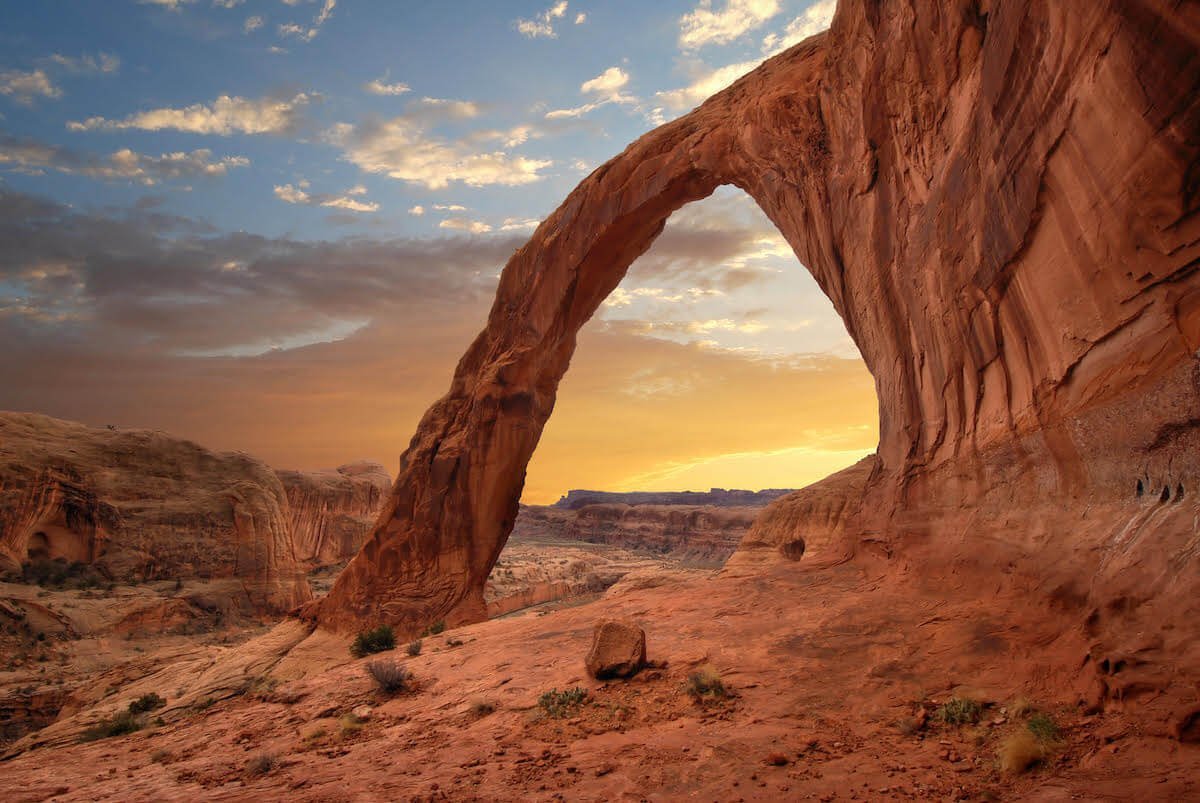
Corona Arch Trail near Arches National Park
By Allison from Eternal Arrival
Practical information about The Corona Arch Trail
Location: Arches National Park
Distance: 3.6 km return / 2.23 miles return
Elevation: 143 m / 469 ft. elevation gain
Type: In and out
Length: 1.5-2 hours (too properly enjoy the hike and views)
Difficulty: Easy
Rating: 4 out of 5 stars!
If you’re looking for a great hike in the vicinity of Arches National Park near Moab, but away from the crowds that throng the official national park, check out Corona Arch.
The Corona Arch is a spectacular 140-foot wide natural arch that is an absolute wonder to behold.
Corona Arch is stunning and it’s a bit off the beaten path, and it’s one of my favorite places to visit in Utah. Corona Arch is located a 20-minute drive away from downtown Moab.
It’s a great place to hike when you’re visiting the sights near Arches and Canyonlands if you’re basing yourself in Moab like many travelers do.
The hike to Corona Arch is not particularly challenging. It’s a 3 mile round trip trail. It takes about 1 hour each way to the Corona Arch if you’re hiking at a leisurely rate.
The scenery on the way to Corona Arch is really beautiful, with lots of red rocks to catch the attention.
The best time to hike to Corona Arch is either early in the morning before the heat of the Utah sun really starts beating down on you or at sunset, when the sunset really illuminates all the red rock colors and makes the surrounding landscape extra beautiful.
That’s when I visited it, and it’s what made the hike to Corona Arch rate a 4/5 for me.
The hike is great because it’s not quite as popular since it’s not in Arches National Park, so it’s great if you’re trying to social distance away from the more popular national parks.
However, keep in mind that it’s very exposed to the sun, so if you do this hike in the day you will need to bring a lot of water and some sun protection.
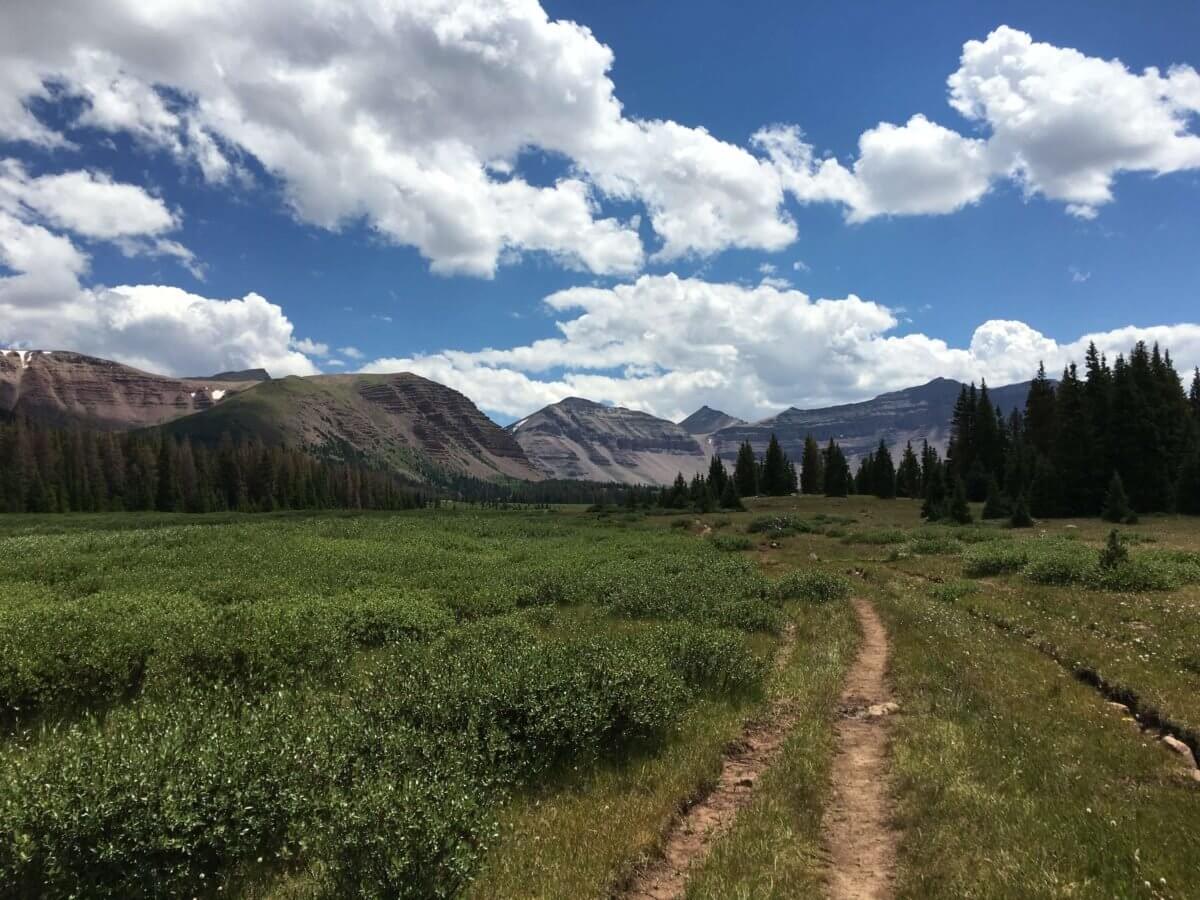
Kings Peak Trail in Northern Utah
By Kristen from Yonderlust Rambling
Practical information about Kings Peak Trail
Location: Uinta Wasatch Cache National Forest
Distance: 43.1 km return / 26.8 miles return
Elevation: 1560 m / 5118 ft. elevation gain
Type: In and out
Length: Multi-day hike (2-4 days is recommended)
Difficulty: Hard
Rating: 5 out of 5 stars!
Some of Utah’s most epic hikes are frequently portrayed through its famous red rock landscapes, but did you know there are also some fantastically dense, forested, high altitude hikes in this state?
One of my favorite Utah forest hikes is the hike to the highest point in Utah, Kings Peak!
This hike not only gives its visitors a chance to see another side of Utah, but it is perfect for those looking for a challenging, multi-day, backpacking experience as well. Kings Peak is located in far northern Utah, just below the border with Wyoming, in the Uinta Wasatch Cache National Forest.
To complete the Kings Peak hike, it is recommended to take 3 to 4 days, and
start by camping near the trailhead at several available campgrounds in the Uintas area.
On this remote trek, expect to pass through densely vegetated forests and towering pines, which initially run parallel to the scenic Henry’s Fork River.
Small forest ponds dot the landscape, such as Dollar Lake, a secluded location that makes a perfect camping spot enroute to the summit of Kings Peak.
You may even be lucky enough to see moose wading in the water in the early morning here!
Other highlights of this hike include the stunning Painter’s Basin, panoramic, high altitude, Gunsight and Anderson Passes, and of course, the summit of the highest peak in Utah at 13,528 feet!
This hike is 27 miles total roundtrip, with over 5,000 feet in elevation gain, so it is rated as challenging and should be taken on with careful preparation, and some experience with higher altitude hiking.
In terms of the reward, I rate it a 5, as there is no feeling quite like standing on the top of Utah! And there is so much diversity to experience along the way on this hike.
This trail is popular among locals, but far less crowded than other iconic spots in Utah, so you are likely to enjoy a feeling of seclusion on this hike as well.
The Narrows in Zion National Park
By Aahley from Jetset Jansen

Practical information about The Narrows
Location: Zion National Park
Distance: 3.1 km return / 1.92 miles return (can go further if you like though)
Elevation: 59 m / 194 ft. elevation gain
Type: In and out
Length: 1.5-2.5 hours (add extra time if you want to go further)
Difficulty: Moderate (because of the fact you are walking in water)
Rating: 4 out of 5 stars!
One of the best hikes in Utah is through The Narrows at Zion National Park. It is the narrowest part of Zion Canyon with steep walls around you.
The trail is the Virgin River itself and for the most part, you’ll be wading through the water of the canyon.
The water level can differ depending on the time of year but can be anywhere from just below the knee to mid-thigh! Good hiking shoes are a must and water shoes are even better.
This hike is one of Zion’s most popular, so expect to be surrounded by other people.
However, the farther you hike, the less people you’ll see. The neat thing about this hike is that you can hike for as long or as short as you’d like.
Most people enter at the Riverside Walk and explore for a while before turning around and exiting the same way they entered.
For the more ambitious, you can choose to exit at one of the spots upstream that will require several miles and will take most of the day.
The hike is labeled as strenuous—but only if you end up doing the 10+ mile hike to the other stopping points.
We hiked down the canyon a ways and then came back to the entrance, and I’d say it was fairly easy. It took us several hours to complete.
There are rocks that are unseen underwater that can cause you to stumble, so you do need to be cautious of that. A walking stick would be beneficial but not necessary.
What makes The Narrows one of the best hikes in Utah are the incredible views you get while hiking. The walls are streaked with different colors and the more narrow the walls become, the more incredible the scene.
Hiking through the Virgin River is a unique experience and a nice reprieve from the blistering sun.
However, it can actually get fairly cold because little sunlight enters the canyon. The temperatures are cool and the water is even cooler.
On a scale of 1-5, I’d give this hike a 4! It has great scenery and I loved the uniqueness of hiking over rocks through the water.
However, I wish there was a closer exit point so you don’t have to backtrack for a shorter hike. But mostly it doesn’t get all 5 stars because of how cold it was! Ha!
Scouts Lookout Trail in Zion National Park
By Dom from Red White Adventures

Practical information about Scouts Lookout trail
Location: Zion National Park
Distance: 8 km return / 4.97 miles return
Elevation: 497 m / 1630 ft. elevation gain
Type: Out and back
Length: 3.5–4 hours
Difficulty: Hard
Rating: 5 out of 5 stars
Zion’s known as one of Utah’s “Big Five” or “Mighty Five” for a reason. In Zion alone, there are so many breathtaking hikes to do but one that we couldn’t miss out on was the iconic Scout’s lookout via Angels Landing.
It’s probably the most recognized hike in the whole national park because of the 21 steep switchbacks you do (also known as Walters Wiggles, lol).
Or it could be because of the stunning views into the valley below. Or it may be because of the crazy final stretch of the hike where you walk on this narrow ridge up to the summit of Angels Landing.
In my opinion, it’s a combination of everything I mentioned and then some.
There’s not one second on the hike where you don’t think you’re in the coolest place ever. I was blown away the whole time it was just so damn cool.
Looking down from Walters Wiggles (the top part of the hike with the 21 switchbacks) will give you one of the most incredible views you will ever see.
The only way we can describe it is if we were to combine what we picture Mars and the Prehistoric Age of Dinosaurs to look like.
So definitely take in every view as much as you possibly can because it’s pure joy while you’re up there. Especially if you only have one day in Zion like we did.
We were planning on doing the whole hike but only went up to the top of Scouts Lookout.
The main reason why we didn’t go was due to the amount of people trying to get to the top of Angels Landing.
The last little bit to the summit is a narrow ridge that has chains to help with the safety of that last stretch. But it didn’t do enough to make it worth climbing to the top.
There were way too many people going in both directions on such a narrow ridge that it wasn’t worth it – and multiple people have died there.
We’re not saying don’t do it but just assess the situation once you’re there and make a responsible decision once you’re up there.
Even if you only make it to the top of Scout’s Lookout the hike is absolutely worth it and we loved it!
We hope you enjoy this hike in Zion as much as we did! Zion is so magical and even though it’s very touristy it still blows you away. Enjoy and stay safe out there!
You may also like…
- 10 Epic Things to Do in Page Arizona
- Ramparts Trail Hike – Cedar Breaks Monument
- The Famous HorseShoe Bend Hike
- A Day Trip From Flagstaff to The Grand Canyon
- Checklist for Hikers
Recap all the best hikes in Utah
There you have it. Our list has incorporated some of the best hikes in Utah from multiple different National Parks written by adventurers and explorers like ourselves.
Utah is an incredible place to go hiking and explore crazy rock formations like most of these hikes have. Canyons, hoodoos or just beautiful scenery can be expected on all these hikes.
If there’s one last thing we share again is that Utah gets extremely hot. This is when the majority of us usually travel so just be prepared for the heat and come prepared with lots of water, sunscreen, and proper attire.
Otherwise, enjoy the great state of Utah and let us know which hike you enjoyed the most. We’d love to hear from you!
Love it? Share it!


Great list! As a local, I still have a few to check off. Devil’s Garden in Arches is definitely one that sneaks up on you! We did it in April last year, started early and finished around 11 AM and it was already so hot and we were getting sunburns. That desert sun will sneak up on you quick!!!
Hey Karisa,
That’s the thing about Utah and hiking there in the summer. Gotta start early in the day to avoid all that crazy heat!
-Jo